Monday, 15 September 2025, 2:37 PM
Created by: Axel Musch
This guide provides instructions on how to add and modify products within a category.
Navigate to Menu > Products to see your list of categories.
Click on the category where you want to add the new product.
Click the + button in the bottom-right corner to open the product creation menu.
You can then fill in the following fields:
Enabled: Toggling this on makes the product visible. Remember, the product will only be displayed in the catalog if its parent category is also enabled.
Name: The name of the product that will be displayed to customers.
Reference: A unique code for this product. This can be used to match the product with other software when exporting orders.
Price: The total price of the product, including VAT.
VAT (%): The percentage of Value Added Tax applied to the product.
Sale Price (From/To): Set a reduced price for the product. You can also define a date range for when this sale price is active.
Use Stock: Enable this to manage the product's stock.
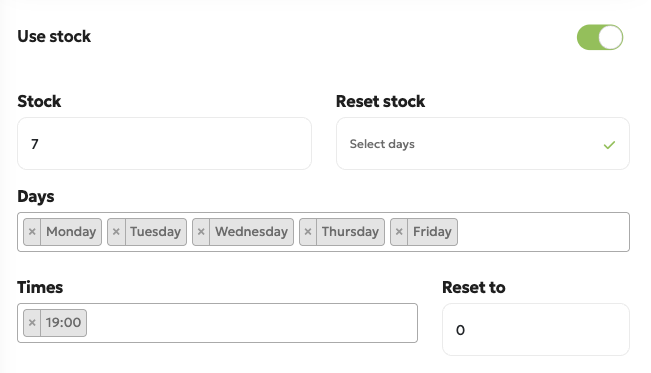
Stock Amount: The current quantity of the product available.
Stock Reset: Configure the stock to automatically reset to a specific value on a daily basis or on selected days at a chosen time (e.g., reset stock to 0 every weekday at 19:00).
Photo: Upload a picture of the product.
Description: A detailed description of the product, which can include important information like measurements or allergy details.
Available on: Select the days when the product is available to be ordered.
Note: If you are using a web catalog, this refers to the days when customers can order for pickup/delivery. For example, if you only select "Saturday," customers can place an order on any day of the week, but only for pickup on a Saturday.
To edit an existing product, simply click on the product from the category list. This will open the menu where you can modify any of the values listed above.